Desktop & menu bar apps
Two native companions ship alongside the web portal: a desktop wrapper that opens your instance in a native window, and a menu bar app that runs silently in the background and gives you one-click access to the most common actions.
Neither app contains any of your data or credentials. They both talk to the same local server as your browser — the only difference is the container they use to open it.
Desktop wrapper (macOS · Windows · Linux)
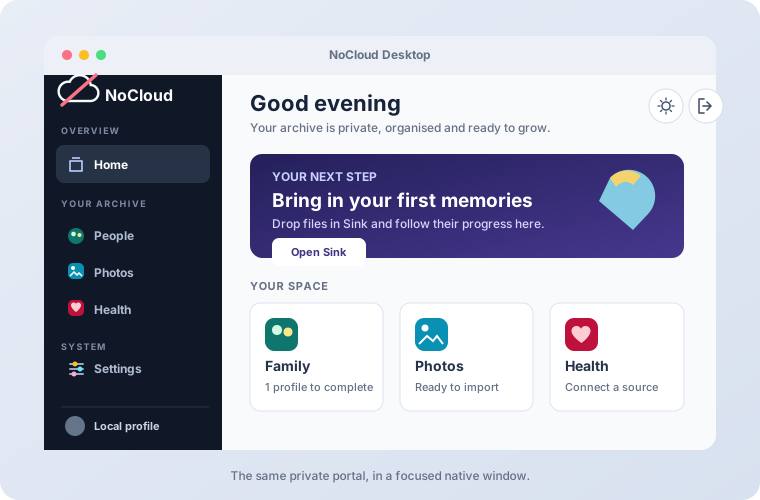
The desktop app uses Tauri and your operating system's built-in WebView (Safari/WebKit on Mac, WebView2 on Windows, WebKitGTK on Linux), so it does not bundle Chromium. It opens the same private portal as your browser, then adds local instance discovery, guided setup and an import monitor without duplicating your data or credentials.
What it does
On launch, the app remembers the portal address you chose. It also recognises a configured
NOCLOUD_SITE_URL or an existing local config/site.env without asking.
On a first launch (nothing saved yet), it looks for a NoCloud checkout already on this computer
(NOCLOUD_HOME, ~/.config/nocloud/home, ~/nocloud, ~/NoCloud, ~/nocloud-core, or common
~/Documents/ locations):
- Found one or more → "Choose your NoCloud" lists them; pick one to open its portal.
- Found none → "Welcome to NoCloud" offers three paths: Connect to my portal (just enter a web address, the same as pointing the app at an instance that already runs elsewhere), Set up NoCloud (install a new instance on this computer, below), or Explore the demo (opens a fictional, read-only archive bundled with Desktop; it needs no setup or external runtime and works offline on macOS, Windows, and Linux).
The bundled demo is the real generated portal, not a separate mock interface. Desktop serves its
synthetic HTML, photos, family graph, messages, and settings from a temporary loopback address.
It never reads a local archive and cannot modify the synthetic dataset. The CLI's nocloud demo
remains the writable development walkthrough described in the CLI reference.
Set up NoCloud on this computer
A seven-step wizard (also reachable from the instance picker via "Set up NoCloud on this computer"):
- NoCloud folder — where the checkout and local data live.
- Archive folder — where imported photos, videos and documents belong.
- Home server address + user — the small always-on machine NoCloud publishes to. No home server yet? Choose "Just this computer for now" instead: the wizard becomes a four-step flow (this list's steps 1–4), skipping the three server-bound steps below.
- Recommended imports — optional WhatsApp and Google Takeout support.
- NoCloud web address — where Desktop opens the portal; it can default to the home server.
- Network — optional domain, certificate mode and WireGuard access; these remain editable in Settings later.
- Portal login — optional Authelia administrator setup when the server is reachable over SSH.
In the single-machine flow nothing leaves the computer: setup generates the instance's pages
(nocloud build) and Desktop serves them read-only on a private loopback address whenever the
portal is opened — imports, the Sink and the import monitor work exactly the same. The portal's
Journey page keeps "Configure this instance" pending and shows how to connect a home server
later (nocloud setup, then nocloud deploy). On stock Windows (no WSL) the wizard explains
that local setup needs macOS or Linux instead of failing mid-install; connecting to an existing
portal and the demo still work there.
Submitting clones nocloud-core, creates a .venv, installs dependencies, sets up
~/nocloud-private from the sample structure, and seeds the database — the same steps
Installation walks through by hand, run for you. A failed step can be
retried by submitting the wizard again with the same folder; already-completed steps aren't
redone. Pointing the wizard at a folder that's already a configured instance is refused rather
than silently overwritten — pick it from the instance list instead.
Once configured, Desktop can open the portal in its own window or show Import monitor. The window stays out of browser history, has its own entry in Alt+Tab / Cmd+Tab, and can be assigned its own desktop space.
Install
Download the installer for your platform from the
latest GitHub Release or build from
source (see Installation). Every release includes SHA256SUMS.txt for verifying
the downloaded installer.
| Platform | File | Notes |
|---|---|---|
| macOS | .dmg |
Choose the Apple Silicon or Intel file; right-click → Open on first launch while builds are unsigned |
| Windows | .msi |
Click "More info → Run anyway" at the SmartScreen prompt |
| Linux (portable) | .AppImage |
chmod +x NoCloud*.AppImage && ./NoCloud*.AppImage |
| Linux (Debian/Ubuntu) | .deb |
sudo dpkg -i NoCloud*.deb |
These builds are unsigned
There is no Apple notarization or Microsoft Authenticode certificate yet. The app connects only to your own server and contains no data, tokens, or credentials.
Menu bar app (macOS · Linux)
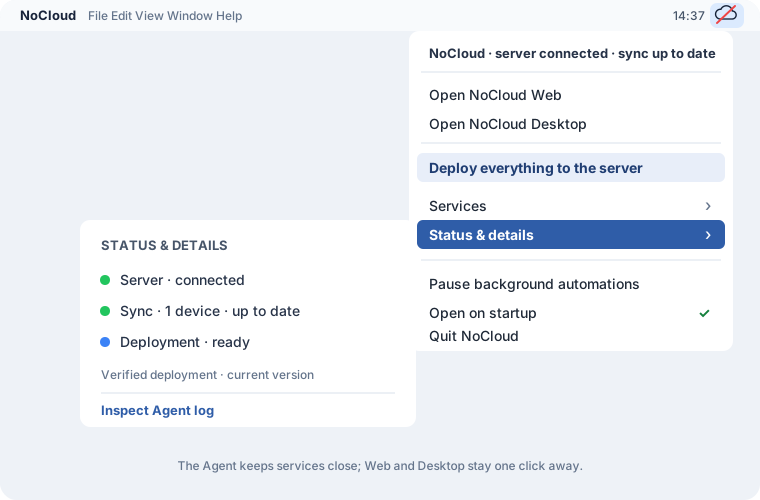
The menu bar app (scripts/nocloud_tray.py, built into NoCloud Agent.app via
py2app) lives in the system tray. On macOS it appears in
the top-right menu bar; on Linux it uses a compatible system-tray icon. It has no Dock icon
(LSUIElement=True) and does not appear in Cmd+Tab.
What it shows
Top section — concise status
The first line reports whether the home server and sync are healthy. A failed or active deployment replaces that summary, so it is visible without opening another menu.
Status & details submenu
- Server reachability and Syncthing status.
- Current deployment state, last verified deploy, deployed version and checkout state.
- The Agent log.
Services submenu
All 14 background jobs, each with a status indicator:
| Symbol | Meaning |
|---|---|
| ✓ (green) | Service is loaded and running |
| ✗ (red) | Service failed or did not start |
| • (grey) | Service not installed on this machine |
The 14 jobs: Net Worth + spending refresh, Immich memories, External disk backup, Mail backup, Mail refresh, Sink mailbox, Repo replica, Immich → XMP export, Server config backup, Typing pause, Daemon (on-demand jobs), Synced docs refresh, Trigger engine, Queue drain.
Actions
| Menu item | What it does |
|---|---|
| Pause / Resume background automations | Stops or starts the locally installed background jobs as one group. |
| Deploy everything to the server | Runs deploy_server.sh in the background and shows a notification when done. |
| Open NoCloud Web | Opens the web portal in the default browser. |
| Open NoCloud Desktop | Opens the installed native Desktop app. |
| Status & details | Opens connectivity, deployment, checkout and log details. |
| Open on startup | Toggles the LaunchAgent so the tray auto-starts at login. |
| Quit NoCloud | First click arms a 5-second confirm window; second click within that window actually quits. This prevents accidental shutdowns from a mis-click. |
Installing the menu bar app
The tray app is macOS/Linux-only and is not part of the standard nocloud setup flow.
1. Build the .app bundle
cd /path/to/nocloud-core
scripts/build_tray.sh
# → apps/tray/dist/NoCloud Agent.app
build_tray.sh runs py2app in alias mode against the local checkout. The resulting .app is
gitignored; rebuild it whenever you pull a tray update — alias mode means the bundle re-executes
your live source on every launch, so day-to-day script edits don't even need a rebuild.
2. Install the LaunchAgent
bash scripts/install_launch_agents.sh
Installs (or refreshes) every service's LaunchAgent — the tray included — from the versioned
templates in launchd/*.plist, substituting the real paths for the __PLACEHOLDER__ tokens.
It's safe to re-run any time: a plist whose content hasn't changed is left running untouched,
so this never needlessly restarts a service that's already up. The tray icon appears in the
menu bar within a few seconds; macOS also starts it automatically at every subsequent login.
Updating
When main changes, nocloud update and the post-merge hook compare the two revisions first.
Agent source changes restart it; bundle, icon, version, or macOS dependency changes rebuild it
before restarting. Desktop source, icon, or build-tool changes create a native installer with
tauri build but never open the Desktop app. Unrelated changes leave both local clients alone.
After a change to the launchd/*.plist templates themselves, reinstall:
bash scripts/install_launch_agents.sh
Linux
On Linux, pystray uses the system tray via AppIndicator or XEmbed depending on the
desktop environment. There is no .app bundle — run scripts/nocloud_tray.py directly
with a Python virtualenv that has pystray and Pillow installed, and register it with
your desktop's autostart mechanism.
Tray vs desktop — which to use?
| Desktop wrapper | Menu bar app | |
|---|---|---|
| Opens the web UI | Yes — in its own window | Via Open NoCloud Web |
| Opens Desktop | It is Desktop | Via Open NoCloud Desktop |
| Runs in background | No | Always |
| Shows service health | No | Yes |
| Triggers deploys | No | Yes |
| Platforms | Mac · Windows · Linux | Mac · Linux |
| Install | Download + open | Build + LaunchAgent |
First import
After a new Desktop setup, NoCloud opens the instance's Import monitor. Put a photo/video file or folder, a WhatsApp export, or another recognized Store export in the instance's Sink. Desktop detects queued items and starts the batch in the background automatically; Process now is a manual retry. The monitor shows every batch's completed and remaining items, current phase and estimated time. Reopen Desktop and choose Import monitor at any time to continue following it.
Photo/video files are copied to ARCHIVE_ROOT/01_Fotos/Onboarded/, recorded in the import index,
and the original source is retained under the Sink's internal processed area. The archive copy is
journaled and can be reverted like any other nocloud onboard import.